1. Menu Bar
1. Menu Bar
1.1. 1. File
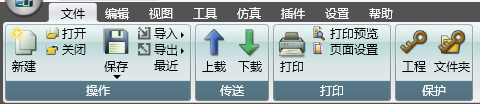
New: Create a new project.
Open: Open an existing saved project.
Close: Close the project currently being edited.
Save: Save the project currently being edited.
Import: Import CSV data into the current project.
Export: Export the data of the current project to CSV format.
Recently: View recently opened files.
Upload: Upload the project from the PLC.
Download: Generate execution program and download it to PLC.
Printing: Use a printer to print the project.
Print Preview: Preview the effect to be printed.
Page settings: Set paper, margin, and other properties before printing.
Project: Set project password to protect the project.
Folder: Set a password for each folder, and enter the correct password to open the folder contents.
1.2. 2. Edit

Revoke: Return the program currently being written to its state before the last operation.
Restore: Re execute the previous undo action to restore the next state.
Cut: Select the content and copy it to the clipboard, then delete it.
Copy: Only copy to the clipboard, do not delete or modify the original content.
Paste: Add the content of the clipboard to the program.
Search: Search for instructions/software components/text in the program.
Replace: Search for instructions/software components/text in the program and replace them with the given instructions/software components/text.
Go to: Navigate the interface to the area being edited.
Insertion: Adding new objects to the entire project or individual program.
Click the triangle button below the [Object] button to open the drop-down menu, where you can select the object to add.
Click the button to the right of the [Object] button to add new content to the current editing program.
Click the triangle button on the right to open the dropdown menu, providing more detailed instructions for adding.
Delete: Add or delete existing objects in the entire project or individual program.
Click the triangle button below the [Object] button to open the drop-down menu, where you can select the object to delete.
Click the button to the right of the [Object] button to delete in the current editing program.
1.3. 3. View
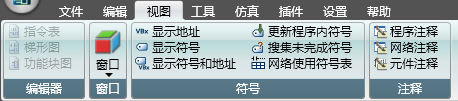
Instruction List: Switch the current program to Instruction List (STL) mode.
Ladder diagram: Switch the current program to Ladder Diagram (LAD) mode.
Function Block Diagram: Switch the current program to Function Block Diagram (FBD) mode.
Window: Click the triangle button to open the hidden window.
Absolute only: Display only the absolute address of the software component, such as M8151.
Only symbol: if there is, display the symbol of the software component; if not, display the absolute address. For example, Always_On.
Symbol: Absolute: Simultaneously display the software component symbol and absolute address, for example M8151: Always_On.
Apply symbols to projects: Update software components that specify symbols in the program and clear previous errors.
Create Undefined Symbol Table: Add all undefined symbols (without specified physical addresses) to the Software Component Manager and create a new table to display them.
Symbol Information Table: Display or hide the symbol table below each program network.
Program comments: Show or hide the program comments on the first line.
Network annotation: Show or hide the annotations at the beginning of each network.
Component annotation: Show or hide annotations below each component.
1.4. 4. Tool

Run: Run the program of the PLC.
Stop: Stop the PLC program.
Compile: Compile the current project.
Upload: Upload the program from the PLC and open it.
Download: Download the currently open program to the PLC.
Monitoring: Communicate with PLC to monitor the status and changes of software components.
Factory restoration: Restore the PLC to its original factory state.
Obtain PLC version information: Obtain the PLC version and additional information.
Retrieve PLC error information: Retrieve the record of the last time the PLC crashed.
1.5. 5. Simulate
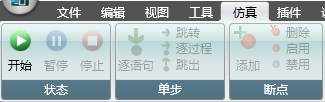
Start: Simulate and run the PLC on the computer.
Pause: Pause the simulation.
Stop: Stop the simulation.
Sentence by sentence: In the simulation pause state, run one instruction and jump to the next instruction pause.
Jump: Navigate the interface to the pause command.
Step by step: In the simulation pause state, run one instruction and jump to the next instruction pause. Skip calling subroutines.
Jump out: In the simulation pause state, jump out of the current subroutine and pause the next instruction outside the subroutine.
Breakpoints: Enable breakpoints when selecting commands to add, delete, or enable breakpoints.
1.6. 6. Configure

Chinese: Switch language to Chinese.
English: Switch language to English.
Plane system: Set up a plane system.
Import graphics: Import HMI graphics.
Communication settings: Set the connection method, communication parameters, and test the communication PLC.
Engineering settings: Set parameter configurations.
Upper level settings: Set the program style.
1.7. 7. Help
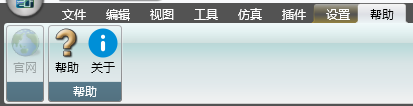
Official website: Visit the official website to consult detailed information and obtain the latest version online.
Help: Open the help document.
Regarding: Display the version of software currently installed on this machine.